

So, here is what happened.
Bambu Lab, after seeing my “evil plan” article, decided that they wanted me to experience their flagship product first hand, and they generously sent me an X1 carbon combo, on ONE condition.
Despite the fact that I generally don’t like to say negative things on my channel/blog, and prefer to share my feedback as constructive rather than outwardly critical, they absolutely INSISTED that I give my raw, unfiltered feedback, both about them and their product.
I’ve been playing around with the X1 Carbon Combo for a while now, and I have to say there have been some Major surprises.
Just like many of you, I’ve watched literally every video I could get my hands on about the Bambu Lab X1 Carbon, the P1P, and any other Bambu Lab product updates.
So as a latecomer, by the time I received my test unit, I thought that I would know everything there is to know about this printer.
And yet, there were a lot of things that really surprised me.
Things that I couldn’t believe nobody is talking about.
And in this review, I’m going to share them with all of you. Who knows, maybe even those of you who own a Bambu Lab product didn’t notice these things.
Let’s find out!
Bambu Lab X1 Carbon Unboxing
Unboxing the X1 carbon, there were honestly very few surprises.
I’d seen folks talk about unscrewing the screws, and noticed that they even had implemented the feedback of influencers like CNC Kitchen by putting stickers to highlight exactly where you need to remove them.
The quality, as you’ve already heard 10,000,000 times, is top notch, and the fit and finish is great.

Here’s one thing that did surprise me, though: There’s no textured plate included. It seems silly, but it wasn’t clear from the website
I guess I just thought they would include one in the package, given just how popular textured plates have become.
Of course, Bambu lab will sell you a high temperature plate, or a dual-sided one, for $30-35, and of course, they give you the “engineering” plate in the box, alongside the cool plate and spare sticker sheets.
So you do have everything you need to print any material out there, but I just thought that was an interesting choice.
I get it – the X1 Carbon is really geared towards engineering materials, and I guess in engineering, you want a smooth surface to reduce tolerances, so that’s probably why the P1P ships with the textured plate and this one doesn’t.
But personally, I definitely prefer a textured finish on all my prints, and not having that option was a bit bizarre. I definitely don’t think this is a way of trying to squeeze an extra $35 out of you – Bambu lab doesn’t seem like that kind of company given how reasonable replacement parts are – but more likely, they wanted to hit a certain attractive-looking price, and adding in that extra plate would’ve gone over cost.
Still, it might be a good idea to give users a choice of swapping out the engineering plate for a textured one instead – or at the very least, put a dropdown on the sales page or a recommended upsell in the shopping cart that let’s me add it to my cart, so that it’s clear to me that I need to purchase it separately.
Though, if I were Bambu Lab, I might A/B test just selling the combo for $1,479 and including the build plate. It’s still thousands of dollars cheaper than an Ultimaker.
The X1 Carbon Software
With the printer out of the box and set up – again, no surprises there – it was time to get going, and that meant downloading not only BambuSlicer for my laptop, but also the Bambu Handy app for my iPhone.
As a side note, It’s still mind-blowing to me that we’ve made such a leap forward as to have dedicated iPhone apps for our printers like Anker Make or Bambu Lab.
I mean, my Prusa MK3S+ doesn’t even have Wi-Fi, much less an entire app ecosystem baked right in, but I guess the app thing won’t surprise any of you if you’ve seen other reviews.
Immediately, though, a few things did stand out to me that I haven’t seen anyone else talk about, and they’re really surprising ones, actually.
As I’m going to talk about towards the end of the article, Bambu Lab’s ecosystem is a “walled garden” – and we’re going to come back to that in detail later, because I think it’s the single most important tradeoff Bambu Lab has made, and it’s very much worth exploring.
But for now, suffice it to say that if you want to use your printer with other software, such as Octoprint or Mainsail, well, you can’t. At least not in the foreseeable future.
Now, Bambu lab has solved this in a predictable and deliberate way: they just built their own software.
But in doing so, they did something really clever that I seriously didn’t expect.
They made an all-in-one suite.
Allow me to explain. Of course, I’d seen online that Bambu created their own slicer, which is a fork of PrusaSlicer, and that’s not surprising.
Lots of manufacturers do that: Creality and Sovol have forks of Cura, for example.
This is great, because it means that the software can make recommendations based on the machine itself, for example telling you if you’re trying to use the wrong build surface for a specific type of material.
But Bambu took it one step further, and did something I haven’t yet seen on any consumer 3D printer.
They built the printer management tool right into the slicer.
This means that unlike with my Voron, my Prusa, or any other printer, where I need to have the slicer integrated to send the files, and THEN open a browser to access the actual printer interface such as Mainsail or Octoprint to actually monitor the print, with Bambu Slicer, it’s all built into one app, and I just click this tab on the top to check on my print or make adjustments.
This, of course, means that I’m missing out on a whole world of plugins and upgrades, and I definitely miss some things like the ability to exclude objects or a way of integrating my DSLR for timelapses, but like I said – more on that later.
There’s a learning curve
OK, Great, so it’s a fork of PrusaSlicer. I should pretty much already know how to use it, right?
Wrong.
Personally, I was reasonably overwhelmed when I first dove into BambuSlicer, which isn’t to say that it’s confusing per se, but just that it is not the same old familiar interface that I know and love.
In terms of user interface, it’s somewhere between PrusaSlicer and Cura, which leverages tabs both on the top of the app and in the settings categories.
They’re all the same things you’re used to seeing, but they’re just organized a little differently, with different names.
Instead of “layers and perimeters”, they organize settings into “Quality” and “Strength.”
If you want to find the list objects, that’s in a different screen, rather than always being front and center. “Add Instance” and “Set number of instances” are merged into “Clone,” and I wasn’t sure if that would push changes that I make on one instance to the others.
There are places that you would think you’re supposed to click, but which aren’t clickable, keyboard shortcuts that didn’t make the migration over, smart new features I haven’t seen before, and a few little “tricks” and new habits that you’re going to need to get into.
All of these things are, of course, no big deal, you’ll figure it out.
In fact, I think a lot of them might even be improvements over PrusaSlicer or Cura.
I’m just saying that if you are already very familiar with PrusaSlicer or SuperSlicer, like I am, don’t expect this to be an instant transition for you, and it will take some time for you to really feel comfortable with this new slicer.
It does most things for you
I finally figured out the slicer, and I was ready to print my first model.
And of course, me being impatient, I didn’t just go about printing a single-color benchy – even if it does take only 16 minutes. NO!
I decided I was going to print dual-tone, engineering-grade parts for my Coron. Using the notoriously tricky ASA.
Immediately, I realized something pretty cool about the X1 Carbon Combo. It kind of just does everything for you.
Of course, I’d seen that a big selling point was the LiDar, the first layer calibration and bed leveling system.
And I’d heard that it did its own input shaping and resonance frequency compensation at the beginning of every print, But because this was my first time using a multi-material unit, what I didn’t consider was just how much other stuff it would do for you.
Here’s an example:
We all know that one of the humdrum little tasks of 3D printing is loading and unloading filament.
And even with so-called “automatic filament loading” on printers like the MK3S+, you still need to physically pull out and push in the filament, cut the ends to be sharp, click some knobs, preheat the printer, tell it whether or not the change was successful, yada yada.
I never realized how tedious and NOT truly “automatic” that process was until I used the X1 Carbon combo.
Sure, you have to push the filament into the little hole in the AMS, but after you do that it kind of just does everything else from there.
It preheats based on whatever filament it detects or registers in the app. It cuts the filament. It purges the filament. It cleans the nozzle. It unloads.
All YOU have to do is choose which filament you want for what part or what print, and it does the rest.
This means that even if you don’t care about multi-material printing (or if, as you’ll see in a few minutes, you are not a fan of wasting so much plastic), you could just load up your 4 most-used filaments, and let the printer do all that annoying preheating, unloading, cutting, loading, cleaning, etc.
So, you can just kick back on the couch in sweats and wait for your print to be done.
This is great not just for the lazy among us, but also, it means that I won’t have so many little filament strands kicking around my office.
Except…
It poops. A lot.
This doesn’t come as a surprise, so I’m not going to dwell on it, because in the first video I saw about the X1 Carbon, Joel the 3D printing Nerd memorably described this behavior as “yeeting” out the filament purges after color changes, so I knew what to expect.
What I didn’t expect was just how much yeeting this thing would do. I mean that in both senses of the word.
First, I didn’t realize just how frequent nozzle changes have to be for a simple multi-color print, but also, just how much filament it purges by default on every nozzle change.
It’s really cautious to avoid color bleed, as you can see from these purge samples, which clearly show just how much filament continues purging long after the color has changed – and this is before the purge block.
This inevitably means that a LOT of filament is wasted, even if you instruct the slicer to purge into infill. This is, of course, something that you can configure in the slicer if you know where to look, but I worry that a lot of people won’t bother.
Now judging from their website, Bambu seems to be an environmentally friendly company, so one recommendation I have for them is to add a little bit of intelligence to the software or the user experience, even if it’s optional, to configure this.
They could, for example, offer to vary the amount of purged material automatically if I specify two very different colors in the AMS menu, like black and white, as opposed to just black and grey.
Or, they could allow me to enable a “popup” menu on the screen after the first filament change, asking me to evaluate the purged filament and calibrate for more or less purge.
Sure, this might seem like a small thing, or maybe even an unnecessary annoyance, and yeah, it’ll probably save you only a handful of cents every print.
But at the volume that Bambu Lab anticipates selling these printers, and the number of material changes that the average user will need to do every print, this little feature could lead to millions of millimeters of filament saved every year in the long run.
And I know mother nature will definitely appreciate that.
It doesn’t mess with trees
Speaking of mother nature, while we’re loading up that filament into the fancy AMS, there’s one thing that you definitely need to know, especially if you, like me, love these cardboard spools from Polymaker or Overture, and it’s this: The AMS is not compatible with cardboard spools.
They just don’t work in there. Period. They won’t spin properly.
This is kind of a bummer, because it’s not so convenient or fun to respool your filament on to the rolls that Bambu provides, and I imagine that the majority of people aren’t yet buying “refill” spools – though that would be nice to see.
Fortunately, the 3D printing community has come to the rescue, and you can 3D print little “rails” that go onto your cardboard spools to fix this. So no worries there.
 And long term… I hope to see more manufacturers offer “refill” spools like Bambu Lab.
It takes 7 minutes to get going
OK, great. The filament is on a plastic spool, it’s loaded up, we press “print” on the beautiful touch screen, and – We wait. A lot.
This is another one that came as a surprise to me, even though I’d heard Stefan at CNC kitchen talk about it on the fantastic “Meltzone” podcast.
This thing takes a long time to get going.
When I heard Stefan say that, I thought he meant like, 3 or 4 minutes. I mean, I’m no stranger to danger when it comes to waiting for prints to start – my Voron 2.4’s 350×350 aluminum plate is pretty big, and can take a few minutes to heat up all the way.
But this thing literally takes 7 minutes to actually start printing. 7 minutes! That’s insane!
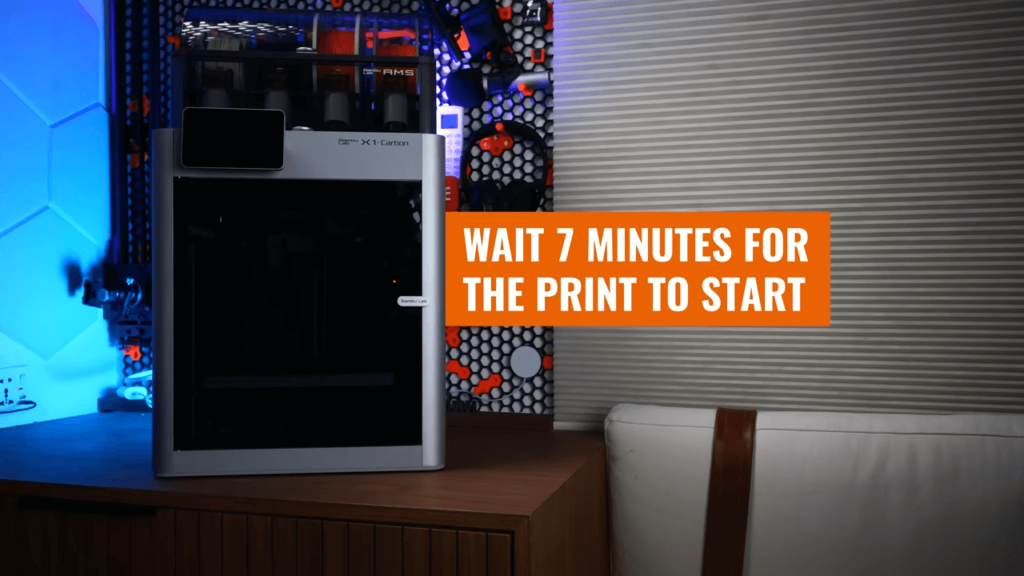
I guess I don’t criticize them for it, because quite frankly, once it does start printing, the first layer is absolutely perfect, every time, and Bambu Lab listened to user feedback and gave users the option at the start of every print to opt-out of some parts of the print start sequence.
In all honesty, I guess I’d rather wait 7 minutes for the print to start, knowing that it will work perfectly the first time, rather than have to monitor the print for the first 20 minutes, or worse yet, have a large percentage of my prints fail on the first layer and need to be restarted. It’s just… 7 minutes!
It’s smart. Like, really smart.
Once I did get the X1 Carbon printing, I immediately had a really unique experience that I just had to share.
It was the kind of experience that makes you realize that you’re dealing with a significant form of intelligence, like when you look into an animal’s eyes and go – oh, wow, this thing gets it.
Here’s what happened:
As you know, the Bambu Lab printers are really fast, and that means that they generate a lot of force – they do, after all, have 20m cubed acceleration.
As you may also know, I work in a cramped office in the city center, with a flimsy folding desk behind me.
After setting up the Bambu Lab X1 carbon, I immediately realized just how much it was shaking the table, and so in the middle of the print, I took one of my lighting tripods and propped it under the table to give it some extra support.
Within seconds, a notification popped up on the screen, telling me that the Y axis – the axis that I’d just put support in front of – had changed resonance frequency since the beginning of the print, and that I should calibrate it at the beginning of the next print.
WHAT?!
This thing is so smart, it’s literally analyzing and measuring the resonance frequencies of all of its axes, in real time, as it’s printing?
And this is just a small taste of how clever this machine is.

If you use Bambu brand filament, It knows what filament you’ve put in the rollers.
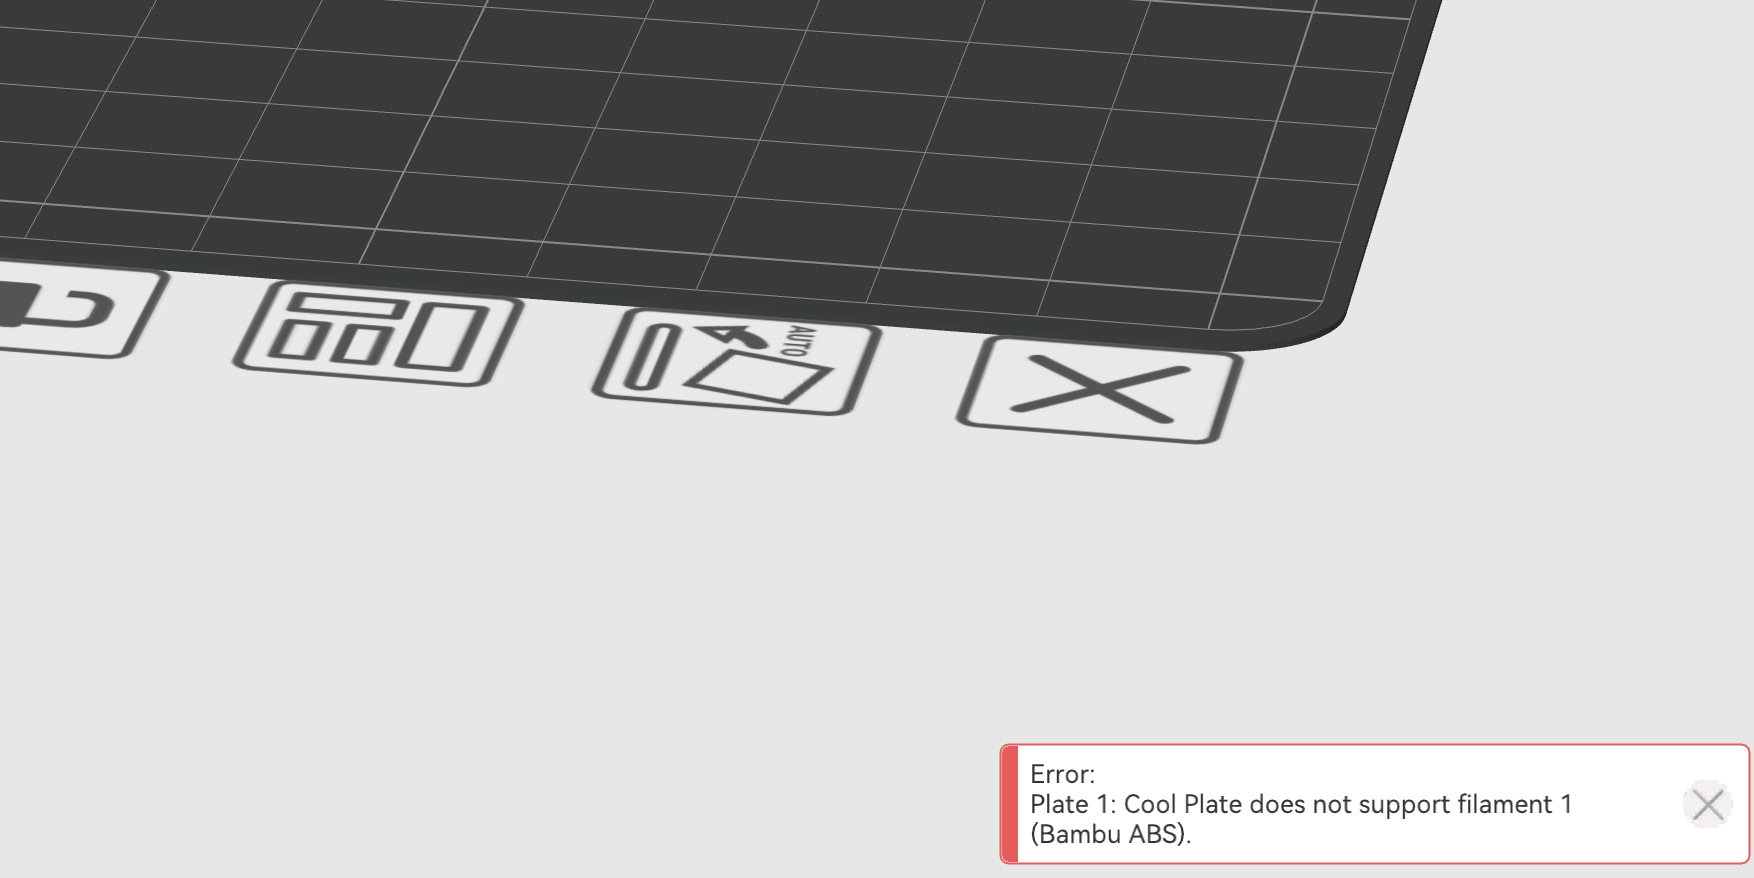
It knows which plate is installed on the heatbed – and alerts you if that plate doesn’t match the one you set in the slicer.
I’m pretty sure it knows what I did last summer.
The point is, this printer is a far cry from my Prusa’s 8-bit board, and it uses all the information it collects to protect you from yourself and make your printing experience easier and more frustration-free.
And aside from all the hype about fast printing, the awesome fit, finish, and user experience, the ability to print all kinds of materials, and the insanely low price relative to other machines of it’s class – all of which you already knew about – that is one of the lesser known “sleeper” features that really makes a HUGE difference in the user experience.
The filter isn’t what you think
One little thing that did kind of annoy me, though, is discovering that the carbon filter in there isn’t exactly what you think.
Bambu is pushing the X1 Carbon as their flagship – the printer capable of printing anything from ABS to Polycarbonate out of the box, and so when you read that one of the differences between the X1C and the X1 is the activated carbon filter, which they advertise as filtering out Volatile Organic Compounds, you assume that the printer is going to filter.
But what I discovered – which you’d only know if you specifically looked on their website and checked under which category they list the filter – is that this isn’t for filtering the air in the chamber, but rather, it’s for filtering the exhaust from the printer.
And I mean, that’s fine, as long as it is actually doing that.
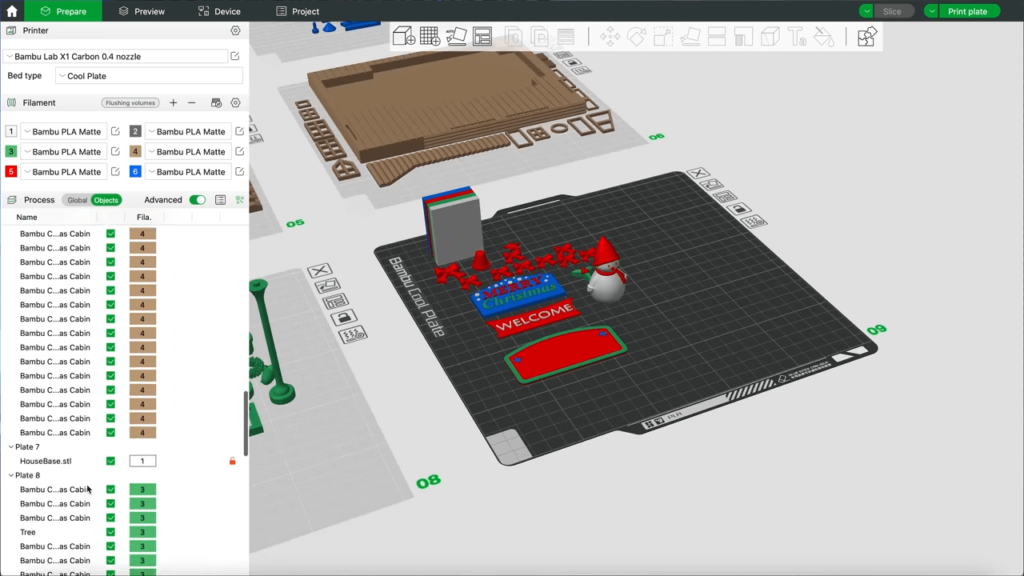
But in the default profiles for things like ABS or ASA, Bambu Slicer, which, as I said before, is really clever about just doing things like reminding you to use the right build surface, does not integrate the chamber fan.
In fact, even if you dig into the filament profile, where there are all sorts of cooling settings, there’s nothing about the chamber fan to be found:
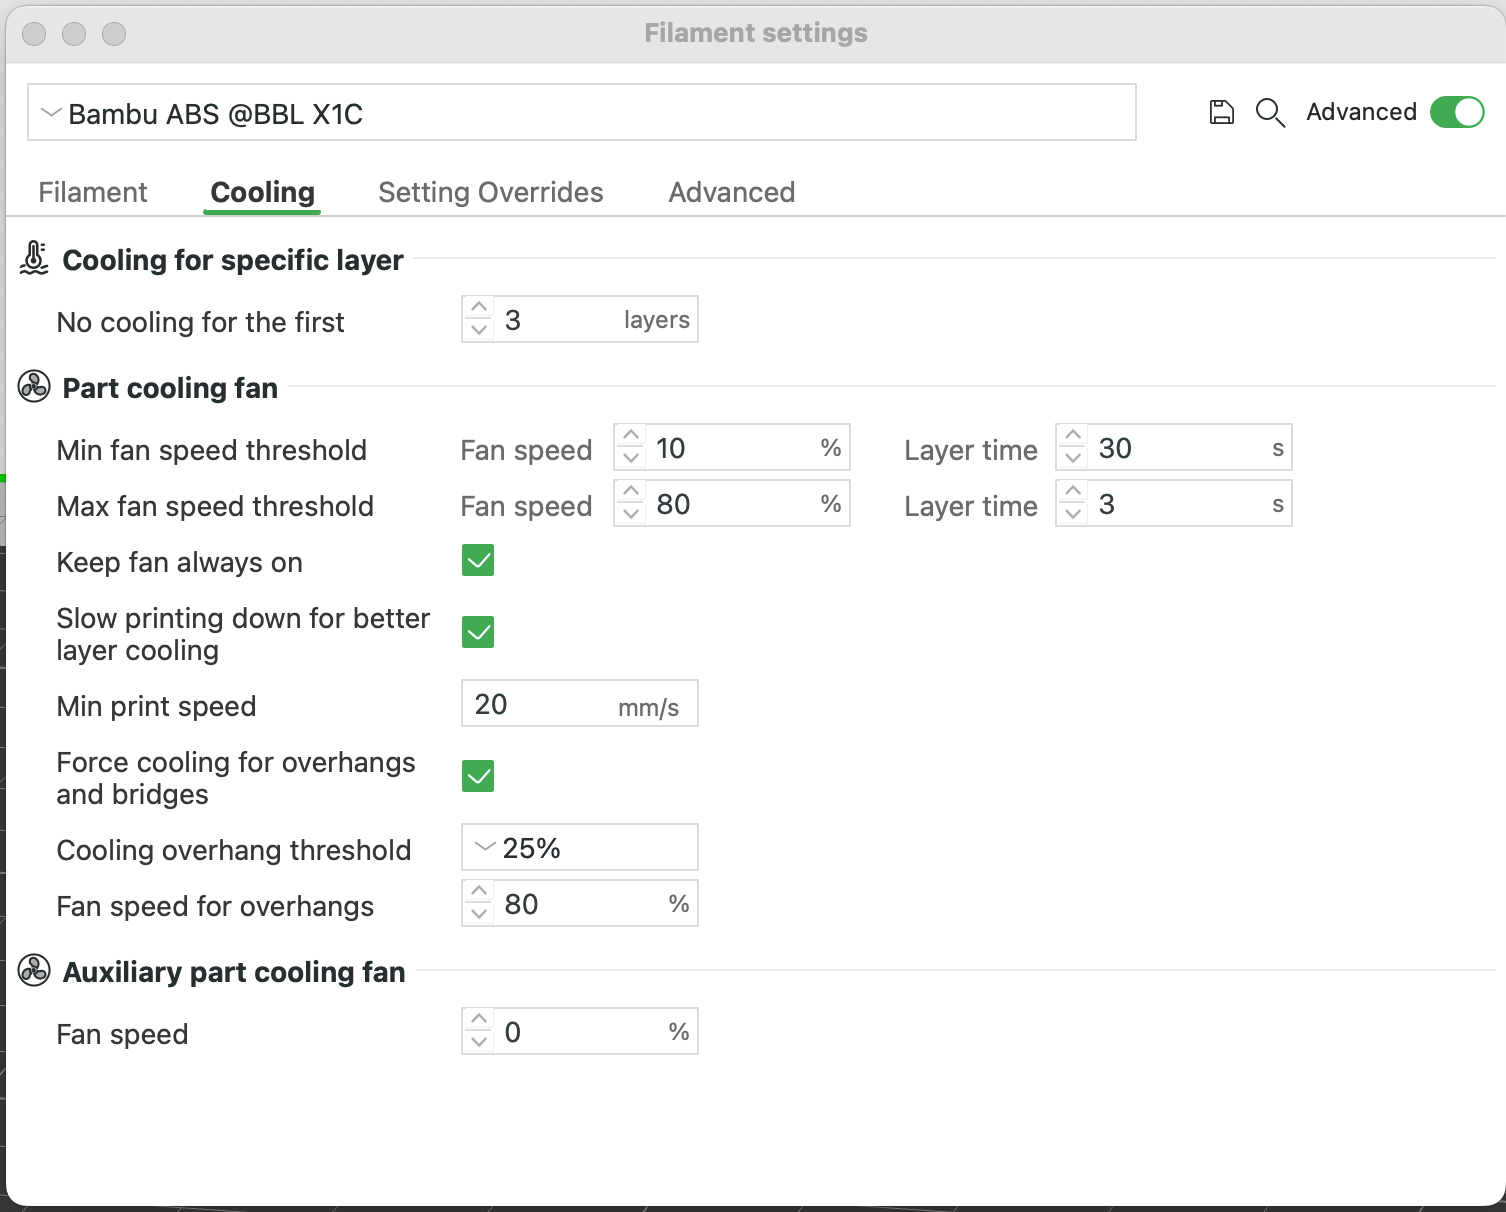
In fact, the only way I’ve found so far to activate the chamber fan is manually while the printer is printing, and I’ve even seen a lot of users that are printing internal 3rd-party filters that filter the air inside without venting it out.
Honestly, I really don’t like that solution, because I feel like it goes against what Bambu is trying to accomplish with “rigorously-tested, perfected, and done for you” profiles, and I definitely don’t think it’s a good idea to cram extra stuff into the printer with warnings like this one.
Fortunately, this is one thing that Bambu Lab can easily fix with a software update, and one more area where their “walled garden” approach – which I promise I’m going to get to in a minute – can really shine.
Because, you see, BambuSlicer is really only ever going to be used with their printers – and a handful of other ones they’ve added like Voron – which they know the specs of.
And that means that if they want to, they can build in specific settings right into the profiles for things like ABS.
They could, for example, set it up so that anytime you select ABS or another material with a lot of VOCs, the machine automatically adds a 5 minute “filtration” stage to the end of the print, where the screen will remind you in bright red NOT to open the door until it finishes exhausting the VOCs through the carbon filter.
Or, given that Bambu Lab only offers this fan for the X1C, they could simply do a bunch of tests to determine at what fan speed, or temperature, the chamber fan is able to operate without warping each type of material (though, of course, different brands may vary), and then simply put those into the profiles for the X1C only.
I’m sure Bambu will improve this over time, and that’s precisely why they send review units out to people like myself for feedback, but for us end users out there, just remember that if you want to actually use the carbon filter, you need to remember to turn it on manually in the software.
Which brings us to my final, and perhaps most important point:
It’s a walled garden
Look, I get it.
Bambu Lab has created what I honestly believe is a best-in-class product here.
You’ve heard this from every other creator who has one, and I agree: this thing is lightyears ahead of the competition.
And I think that they, like Apple, would argue that this was made possible only by creating a complete ecosystem – from soup to nuts.
They make the printer. They make the hot-end. They make the material switcher. They make the software. They make the filament. They make the replacement parts.
And just like Apple with Apple Silicon and MacOS, they’ve been able to achieve significantly better performance, because the hardware and the software are designed to work in perfect harmony, without needing to waste engineering resources designing for many different models or edge cases like user upgrades or hardware variations.
I fully appreciate that.
But it also means that for the time being, you are 100% dependent on them for each and every part of the equation, even at the expense of repairability and customizability.
So if, for example, you want to use another slicer, such as PrusaSlicer or Cura, or you want to use different software like Octoprint for monitoring your prints and doing timelapses – well, you’re out of luck.
And don’t expect to see any CHT nozzles, Revo Obxidian nozzles, or any of that stuff come out for Bambu’s products any time soon.
In fact, even the build plates have a propriety identifier in them, so companies like WhamBam might be out of luck, too.
But it doesn’t necessarily have to be this way.
I mean, Bambu Lab could still maintain control over their product and ecosystem, but open certain parts of it up to third party innovation, similar to how Apple has the Made for iPhone certification program for hardware, and the App Store for software.
Personally, I’d love to see CHT nozzles and WhamBam build plates on the hardware side.
I’d love to see my favorite filament manufacturers implementing RFID chips that are Bambu Labs certified to work with the AMS on the filament side.
And I’d be thrilled to see an App Store where I could download approved third-party plugins like Exclude Object, Obico, and so on.
And yet, at the end of the day, this would be a serious win-win for Bambu.
They get to maintain the top-to-bottom control of their product that gives them this tremendous edge, but they benefit from others innovating on their platform.
After all, it seems to be working for Apple – who’s the world’s most valuable technology company, AND has the highest marketshare of any smartphone manufacturer in the world.
Their products, from iPad, to iPhone, to Macbook, boast the highest consumer satisfaction in each of their respective categories.
And, I mean, I love Apple products.
From the Apple Watch, to iPad, Mac, iPhone, Apple TV, and just about anything else they want to sell me, I have been happily living in the walled garden for over a decade now.
So, unless and until Bambu Lab opens up parts of their hardware and software for third parties to play ball, I think you have to ask yourself: how much do you really care about things like 3rd party software, open source hardware, and customizability, if they come at the expense of product performance and quality.
My Conclusion – Should You Buy The X1C?
For me, personally, I’ll definitely be using my Bambu Lab X1 Carbon a whole lot more in the future.
I really like this printer, and I think that with a few software tweaks, it’s only going to get better.
And while I’m definitely not letting my Voron go any time soon, I can already feel that the X1C is starting to replace my Prusa MK3S+ as my go to, “it just works” printer, and I can recommend it whole-heartedly.


Being able to monitor your printer, and print from the slicer, is nothing new, your comments are incorrect to say an all in one suite is not available on other printers. I’ve had this feature on a 5 year old printer that still going strong, xyz davinci Pro 1.0. I’ve read many articles and watched hours of videos about the p1s, x1 and k1 max as wanted to explore this high quality super fast printing as I realise my xyz is getting on in years and not the quickest. To my surprise I look at these three printers and think, why are reviewers raving about all in one software suites, fully enclosed, wi fi capable, usb to pc, really good quality prints when my 5 year old printer has all of this, in fact the images I’ve seen seen of prints from the k1, p1s and x1 are not as good as my xyz. The only thing I don’t have is the speed and I think do I want to sacrifice quality for speed and the answer is a resounding no. cost £599 when it was purchased 5 years ago and the same model is still being sold today, may be xyz were ahead of their time?