
In this article, I’m going to share how I used FREE CAD software, 3D Printing, additional hardware, and laser cutting to improve the ergonomics and usability of my iPhone 14 Pro MAX.
And while this might seem like a silly, simple little project, fear not, because as we go along, I’m going to give you valuable insights into how I go about doing a project like this – as a self-taught, non-engineer maker.
Let’s dive in!
Project Requirements
First, a little bit of background and an overview of the project’s requirements, if you will.
Have you ever noticed that your smartphone – whether Android, iPhone, or… Pffmph… Windows Phone… has a GLARING ergonomics issue? If you don’t know what I’m talking about, just go ahead and pick it up with one hand.
Do you notice what you’re doing there to keep it from falling down? If you’re like me, you use your pinky finger – or your other hand – to keep the device from sliding out of your hand.
This can get tiring, causing strain on your pinky, and it’s just downright annoying. Fortunately, a few years ago, I discovered the Popsocket, a little piece of plastic and flexible material that sticks on to the back of your phone, and then pops out to basically put a collapsible handle on it. As wireless charging has become more prevalent, pop sockets have advanced to include detachable sockets.
You may remember from my “50+ things you didn’t know you could print” article that I printed phone cases for my wife and I with little cutouts to minimize the distance between the phone and the charger.
But then, when Magsafe came out for the iPhone, they leveled up their design to take advantage of the snap-on functionality of Magsafe. It costs a whopping 30 bucks, but it works quite well, I’ll admit.
This, however, meant that you were restricted to wherever they wanted the actual handle to be centered – which, in this case, was in the middle of the magnetic ring.
That was manageable, albeit a little bit too high, when I had the normal sized iPhone, but recently, I upgraded to an iPhone 14 Pro Max – and I was faced with a little issue.
The pop socket was in the wrong place, and suddenly, I was resorting back to the little “pinky trick” all over again.
Fortunately, I have a 3D Printer, (Or, like, 10 of them) and thanks to Michael Laws over at Teaching Tech, I also know how to use OnShape, a parametric design software.
Design
First things first, I jumped into OnShape and sketched out my vision. Basically, I wanted to recreate the exact design of the official popsocket, but instead of centering the rubber handle piece in the middle of the magnetic ring, I would put it down as low as I possibly could.
Using OnShape, this was really easy. I just needed to sketch out the design, extrude things where I wanted them, and chamfer some edges.
Up next, it was time to add in the magnets.
I created an offset plane – which basically meant another sketch plane at a different height – and drew in a ring for magnets, as well as for the alignment magnets on the bottom.
Now, let’s talk a second about the height of the magnets. Despite the fact that the original popsocket seems to have a simple rubber sticker over the back, my plan was to create the design in such a way that I could pause printing, insert the magnets mid-print, and continue, so that the magnets would be seamlessly integrated in the strongest way possible.
This clearly isn’t possible when mass-producing this product via injection molding, but it’s one of the many benefits of 3D Printing, so why not take advantage of it?
Originally, I ordered a bunch of cheapy magnets from AliExpress, which were clearly intended for less demanding applications, such as adding magnetic alignment to your existing wireless charger. But when I tried to use those, the magnetism was not nearly strong enough to hold the phone, much less deal with the strains of my pulling the phone out of my pocket.
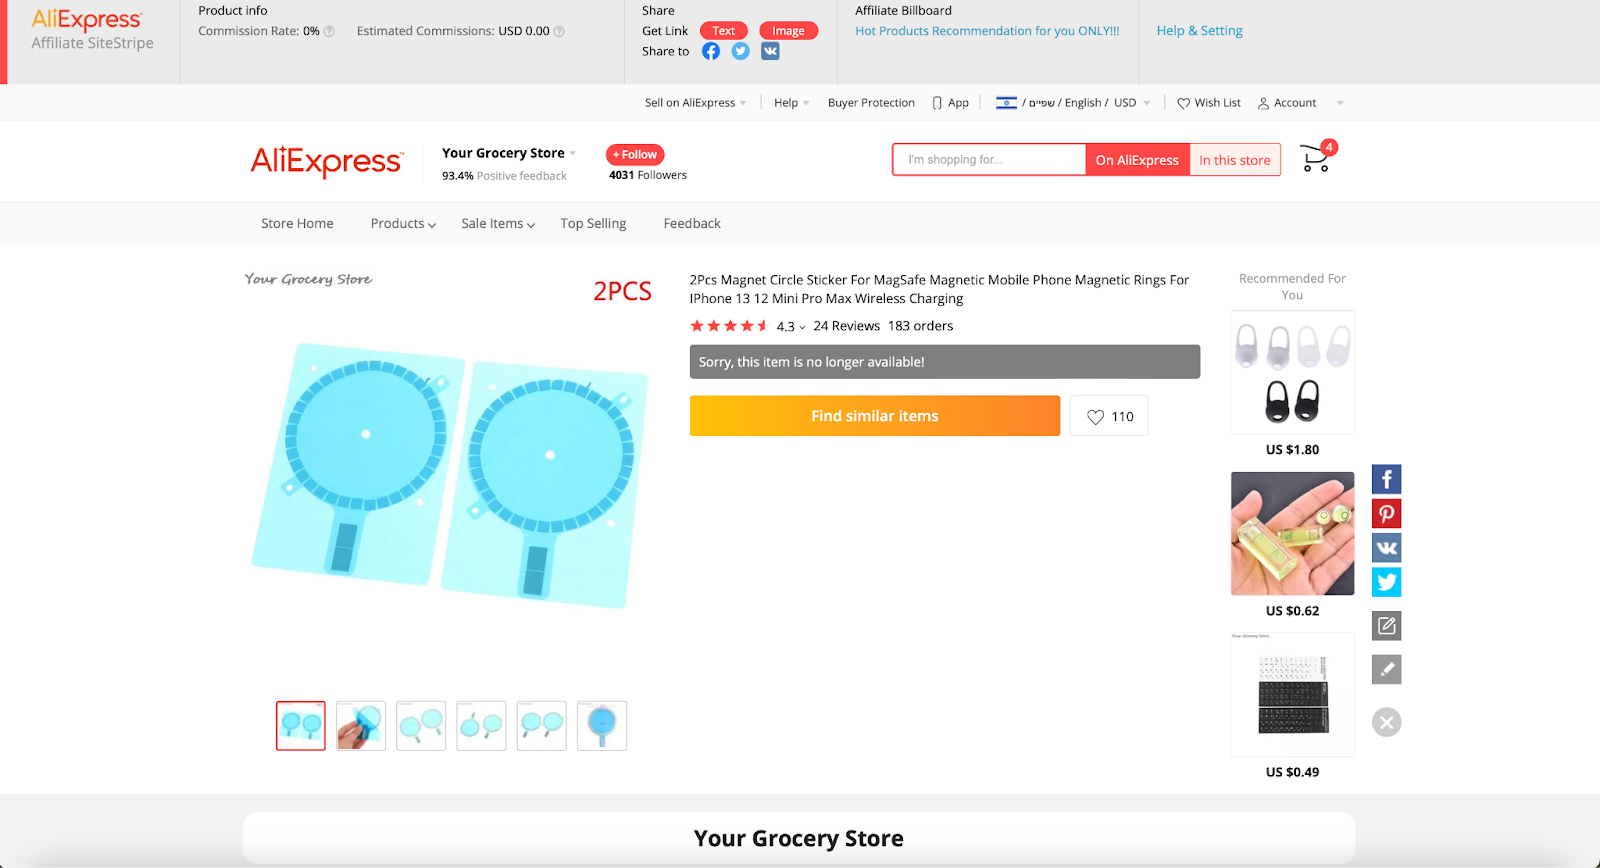
I tried stacking 3 or 4 sets of these to increase the magnetism, but to no avail. I even tried a version using cylindrical magnets I had on hand, but the polarities weren’t right, and the phone still wasn’t supported. It was back to the drawing board.
It took me a while to find a product that would work properly, especially because I could tell that the polarities had to be just right. Fortunately, I was able to find this product on AliExpress, which is actually designed for mounting your phone places. Now we’re getting somewhere. They weren’t cheap considering they’re just a handful of neodymium magnets, but I decided to order a few sets to play around with.
While we wait for those to arrive, let’s take a moment to also talk about magnetism, and how it works. We all know that magnets have a polarity – a side that attracts and a side that repels – but did you know that a magnet’s strength decreases exponentially as it gets further away from another magnet?
This means that the difference between laying down one single, 0.15mm layer starting the cutout for the magnets, and two layers, at 0.30mm in total height, is not half as strong, it’s actually one QUARTER as strong, which probably explains why the folks who make the original Popsocket opted for such a thin piece of rubber to hold their magnets in.
With my base design ready, and the new magnets here, it was time to start prototyping.
Prototyping
Now, I’m not going to bore you with the story of how I printed about 20 of these before I figured out a bunch of various things, one, because I didn’t film any of it.
This isn’t CNC Kitchen, after all , but also, I think it’s enough to just say that prototyping – or, in other words – printing a bunch of parts that don’t work for one reason or another – is a crucial part of this process, and it’s why having a fast printer makes such a difference in being able to move your project forward faster.
Because I modeled this out in a parametric design software like OnShape, it was really easy to experiment with a few versions of my design, and test to see if I really needed to get as close as 0.15 or 0.20, versus having the extra strength of 0.30mm and figured out pretty quickly that more magnetism was better, and every micron did, indeed, count.
This also meant that there was a difference in magnetic force whether I used a textured PEI sheet, like the one I reviewed in my “Bambu Lab Knockoffs” video, or the smooth WhamBam sheet, and opted to print all further prototypes with the WhamBam sheet exclusively.
With the new, stronger magnets, I now had a very solid design for the base plate that stuck to the phone beautifully. Now, it was time to convert it into a finished product.
Finished Product
For my build, I was fortunate enough to have a few extra real popsockets lying around, and so I chose to use them because they are smoother and more polished. You could also pick up some “fake” ones on AliExpress for a few bucks.
But just for fun, and to demonstrate how this project could be done with all 3D Printed plastic parts, I also tried printing a free and open-source design by ebro002 on Thingiverse. It did require some assembly and gluing, and the final result is not nearly as thin as a real popsocket, but it works great.
If I were trying to redo this without buying a real popsocket, though, first of all, I’d dry my TPU a bit better and I might redesign it so that there are 2 collapsing points instead of one, which would make it sit flat, like the original popsocket.
I also would probably make the walls a bit thinner, because at least with the 95A and 98A TPUs that I printed with, the popping action is firmer and more difficult than I find comfortable. Still, it’s worth noting that you definitely could do this project without buying any ready-made parts, except of course the stronger magnets.
As for printing the final product, I opted for ABS. There are a number of reasons for this, but the main one was that I might choose to vapor smooth the product later, to get rid of the texture on top. I considered printing it upside down with a smooth PEX plate, but the chamfered edges would never print properly, and I didn’t like the feel of the prototypes with filleted edges.
Another reason for ABS, though, was that sometimes my phone can find itself in “hot” situations, for example if I leave it in the sun for a few minutes while at the park, or I leave it in the car. PLA really doesn’t do well with heat, so either ABS or Nylon seemed like the natural choice. Time to print!
When I glued the popsocket onto my custom-made base, a few things stood out at me.
First of all, the fit was a bit tight – a reminder to leave tolerances on any X-Y holes, or enable XY hole compensation in your slicer, because a 3D Printer will inherently make holes smaller when it simplifies the geometry of their circles.
Additionally, when testing out the product for a week or so, I realized that although the magnetic pull between the phone and the base was very strong, the base would constantly lose alignment due to the fact that there was no friction.
I considered printing the first few layers in TPU, which has phenomenal layer adhesion and strength, but in my testing, TPU was even more slippery than the ABS. I didn’t have access to any of the “Rubber” material that Zack Freedman recently tested out, and plus, it looks like a real nightmare to work with, so instead, I got creative.
I took a thin piece of rubber which was given to me years ago by a physical therapist. I then used OnShape’s built-in “drawing” feature, and created a drawing of my model, from the bottom up. This gave me the exact shape I needed.
I then took that image, and pulled it into the FLUX Beam Studio software, scaling it up 99% of the appropriate size. This allowed me to precisely cut a piece of rubber which wouldn’t be visible when installed. Yes, I could have probably done this by tracing an exact knife, but what’s the fun in that?
I epoxied the rubber to my 3D Printed part, and voila! I now have a custom-made, magnetically-attaching pop socket suited for the iPhone “Pro Max” size phones.
Conclusions & Project Review
Overall, I’m really happy with how the project turned out.
To be fair, I still need to do a little vapor smoothing, to get rid of this nasty texture, because the “ironing” feature of my 3D printer definitely didn’t turn out perfect. And, if I’m honest, the popsocket is STILL a little higher than I’d like it, so I’m toying with the idea of making a thicker prototype that seats the popsocket over the magnets themselves.
But all in all, this project was a LOT of fun. It gave me the opportunity to sharpen my CAD skills, integrate additional parts into my build, prototype different materials on my 3D Printer, and even find a cool use for my laser cutter. Oh, and since making this, a bunch of my friends have asked me to make some for them, too, because $30 + shipping for a popsocket is honestly pretty ridiculous.
Of course, I will be uploading my STLs and gCode to Printables.


")
