These days, the range of tools and materials available to us as makers is expanding like never before.
From engineering grade composites, to CNCs, lasers, and more. And with the rise of combination machines, it’s all more accessible and practical than ever – even in a home or personal workshop.
But what new capabilities do these types of consumer-grade machines actually enable?
Well, in this guide, we’re going to find out, with a build unlike anything I’ve taken on before.
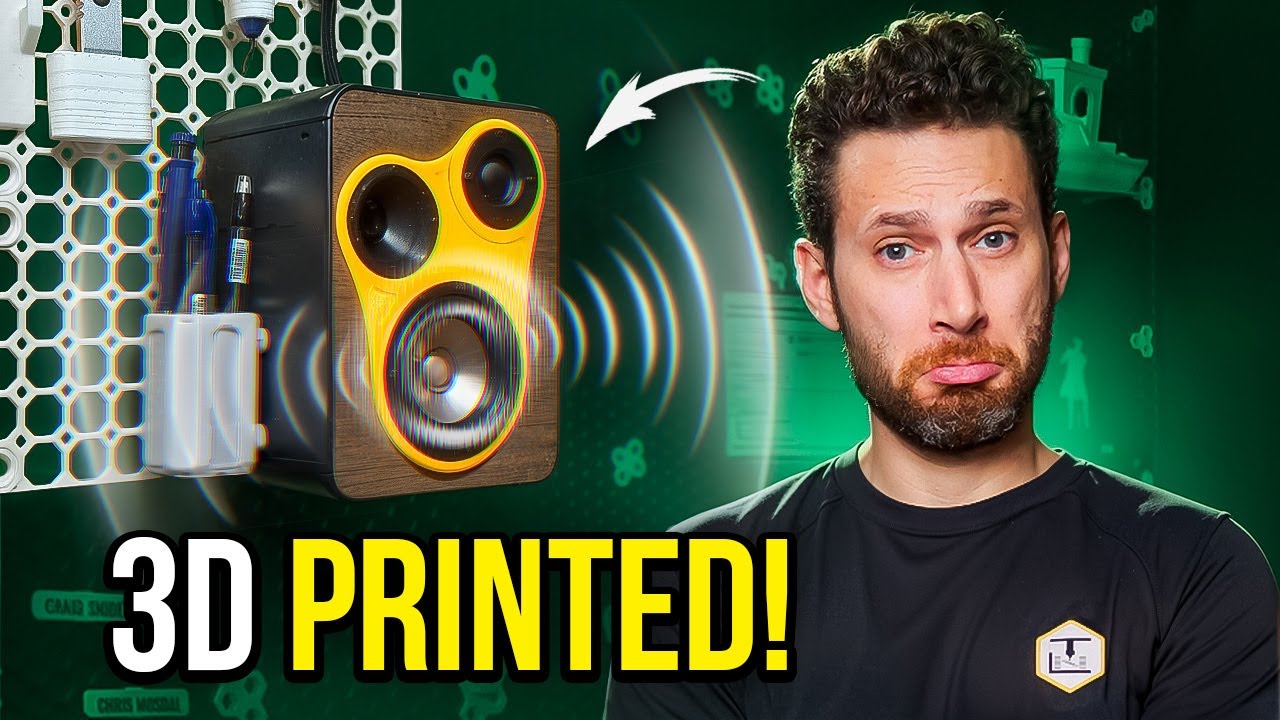
A set of fully custom, Bluetooth speakers that combine a very much “3d printing native” ecosystem – Multiboard – with a handful of mediums and processes that are completely new to me – and probably to most of you.
Let’s get after it.
The Printer
For this build, we’re going to be using the SnapMaker Artisan, which is a 3 in 1 beast of a machine that can be converted from an enclosed, 400×400 3D printer into a CNC machine or a laser in literally seconds.
SnapMaker also sent over all the fixins, from their rotary module, to the air filter, both a fiber-like and a blue-diode laser, air assist pump, and even consummables.
Full disclosure, they also sponsored my video, but besides telling me – both directly and on the machine itself – to “Make Something Wonderful” – and checking the video for any factual errors, they’ve had no creative or editorial control over the video or what I say.
I’ll be showing you what the Artisan is capable of throughout the video. So if by the end of this guide, you’re interested in checking out their full line of 3D printers, lasers, and 3-in-1 machines, you can see them here.
The Project
So, what should we build, FilaFam? Well, to be honest, I racked my brain on this one.
Personally, I’ve never really worked with a CNC machine before, and because 3D printing is so thoroughly in my comfort zone, I feel like my creativity tends to stay within those bounds.
Fortunately, it was at this point that a video popped up in my feed from a lesser-known YouTube Channel, Pisces Printing.
There, a guy named Justin creates these incredibly awesome 3D printed speaker designs, based on a treasure trove of knowledge about acoustics, response curves, tension peaks, and a bunch of other stuff that I didn’t even know was a thing. But I was intrigued.
If you don’t already know, I love the idea of using 3D printing to create better, cheaper, and customized alternatives to expensive, store-bought products that I actually need, and since I don’t yet have any speakers in my studio, this seemed like the perfect project.
I decided to reach out to Justin, and see if he was willing to do a cross-channel, 2 video collab. I’d provide the publicity and plenty of mentoring on the YouTube game and the process of video creation, and he’d provide the technical knowledge, experience, design, and really everything.
Actually, we’d initially agreed that I would do all the external design and CAD work, but once we got on a Zoom call to strategize, I think it became abundantly clear to both of us that that wasn’t a great idea.
The Audio Equipment & Speakers
Let’s start off by talking about the audio equipment and speakers.
Because of everything going on where I live in the world, shipping is even MORE expensive and slow than normal, and so ordering from the typical American or European speaker suppliers – or even Amazon – was not really an option.
Plus, we both agreed it might be a fun challenge for Justin to take some incredibly cheap, generic, AliExpress components – and see if he can actually design a speaker that produces GREAT sound out of them.
So with that, we scoured the depths of AliExpress and came up with a list of components that SEEMED acceptable..
We chose these 3-inch speaker driver units for $37 a pair. These tweeters, at a suspiciously cheap $6 a pair. These 400W crossovers, which are basically the electronics needed for the inside of the speakers, at just $10 each, and then this Bluetooth Digital amplifier, for $20 – plus some speaker wire I had lying around.
Total cost: $82.47 + whatever materials we use for the housings.
Which brings us to the Design Considerations:
Design Considerations
Take, for example, mounting the speakers. Recently, I covered basically every vertical surface in my studio with either Multiboard or HoneyComb Storage Wall.
It was at this point that I realized that Multiboard is much more than just a pegboard alternative for your wall.
It’s an entire ecosystem, including, for example, Multibins, which are these versatile, modular, and customizable bins. Not only do those have a wide variety of ways to mount onto multiboard in ways that are easy to adjust, but they also have their own rails, allowing you to mount things to the bins themselves.
This means that not only could I, say, expand the speaker if I wanted to add an external subwoofer in the future… but also that I don’t need to lose the entire area where I mount the speakers as dead space. With a little luck, I can actually use the speaker housings themselves as real estate for mounting tools, displaying cool 3D prints, and so on.
Also, because I have Multiboard all across my office, I could, at least ostensibly, unhook the speakers from my desk area and move them to another spot in the studio if I decide to rearrange the furniture.
Pretty quickly, I was sold on the idea of using Multiboard to house a speaker – and we were off to the races.
Cross Collaboration
The first step was to reach out to Jonathan over at Keep Making.
You see, for the best sound response and to prevent the material from flexing, we ideally wanted at least 3mm thick walls. Sure, we could easily have used the standard 3x4x3 multibin as-is and then laser-cut some extra material on the inside to reinforce it, but we also wanted to create a version that didn’t have all of the holes on the sidewalls. Fortunately, Jonathan was kind enough to whip up a remix with the thicker, unperforated walls, because, uh… I really suck at Blender.
From that point, Justin took over the CAD and design work, testing and paying careful attention to the speakers’ acoustic performance.
Actually, he’s releasing a companion video to this one, all about his design process, technical parameters, testing the drivers, and how they actually perform, so I highly recommend you check that video out, linked below, to learn what goes into something like this.
Believe it or not, it doesn’t seem THAT difficult to learn, and he shared with me a bunch of incredibly powerful tools that he uses to do all the complex mathematics and simulations for him, so if you’re interested in acoustics or building your own 3D printed speakers, you’ll definitely wanna subscribe to his channel.
3D Printing the Speakers
So now, it’s time to actually create these things.
Outer Housings
I started off with 3D printing the outer housings, and because we want the outer housings to be rigid, I chose some carbon fiber PLA.
This really limited my color choices – I might’ve preferred white – but I’m thinking that the tradeoff is worth it, and worst case, I can always paint them.
On the note of carbon fiber, I was really happy to see that despite using a pretty unique dual-nozzle toolhead with a quick-swap heat sink, the SnapMaker, unlike, say, a Bambu Lab printer, still uses commonly available M6 thread nozzles, so I already had plenty of compatible hardened nozzles lying around.
It also has an automatic utility for aligning each of the nozzles in X, Y, and Z – though you can also manually adjust the Z during printing, which those seasoned vets in the audience will appreciate.
Because this print was going to take such a long time at 0.16mm layer heights and solid infill… and because this filament has sat out for literally years, I also made use of this fancy DryWise in-line filament dryer, which dries the filament as you print it.
Printing the two housings, honestly, went off without a hitch, so let’s move on to something more exciting, shall we?
Air Channels
The next thing I needed to print was the air channels, which direct the air from the speaker outward.
Apparently, as I learned from Justin, these need to be a very precise size to get the maximum performance out of the speakers, and ideally, you want smooth, organic shapes to properly direct the airflow, ideally ideally, without rough surfaces or marring inside.
Fortunately, the SnapMaker Artisan – released in 2022 – is the first printer I’ve ever had with a rapid-switching, dual-extrusion toolhead, what, you thought that was something new and innovative?
And after some successful initial tests, I decided to play around with this feature and see how it could improve the end result. At first, I tried some leftover Bambu Lab Support for PLA material that I’ve had on the shelf for ages, just as a basis for comparison. I’ve honestly always hated this stuff for a few reasons, but I figured I’d save the more exotic stuff if I could.
The end results were ok, but as expected, stringy, and I don’t think I cleaned the build plate well enough, because the purge tower tipped over. Still, I was able to remove the supports, both inside and out, and get a clean part… even if removing the internal supports took a good 15 minutes.
For the second version, I tried printing with PolyMaker’s PolyDissolve S1 PVA, which dissolves in water.
There was a profile available in SnapMaker’s Luban software, though I think I could have tweaked it for the PolyMaker brand and gotten better results. This was the first time I’d ever used dissolvable supports, and all I can say is it’s weird. And gummy. And kind of disgusting. But, here’s how the removal process went.
Now, with the 3D printed parts ready, it was time to switch the Artisan into a CNC machine, and experiment with some other mediums for the other components.
CNC Machining & Laser Cutting
All right. I’ve procrastinated this long enough.
It’s now time to get to the part that I’m absolutely dreading, which is learning CAM and CNC and converting this thing, to a CNC machine. Should probably find the instructions. I’m not going to, but I probably should.
Wow. That’s pretty satisfying.
Conclusion
Obviously, I can’t convey how these speakers sound to all of you, but I’m impressed!
And more importantly, I’m happy with how they turned out. But I’d love to hear what you think in the comments below.
As for the SnapMaker Artisan, I gotta say, I’m really excited about having an easy-to-use laser and a CNC with such a large work area, not to mention this is currently my only enclosed nozzle or tool switching printer.
Initially, when SnapMaker offered to send this over, they told me that I could get rid of it after the video if I didn’t have the space to keep it, but I’m gonna be real with you – This thing isn’t going anywhere. And I’m really looking forward to using it in some upcoming projects.
Finally, as for the speaker design, Justin is going to be publishing the files, so you can try printing them out yourself if you’d like.
That’s all for this week, but I’ll see all of you on the next layer.


