If you look at a 3D printed model, you may be forgiven for thinking that it’s either completely solid or indeed hollow.
If we’re talking about resin 3D printing then yes, it would be solid but in the world of FDM (Fused Deposition Modelling) 3D printing, the answer lies somewhere between the two.
We’re talking here about infill and it’s a crucial factor to bear in mind when printing a 3D model.
The infill is basically the skeleton of your model and as such supports the materials by which its surrounded. Getting the right shape and size for the skeleton or infill is therefore essential to the structural integrity of your 3D print.
But how do you go about deciding what the best percentages are for your infill and how does this actually affect your model?
Let’s take a closer look at what’s need to get the right infill balance.
What Does Infill Mean in 3D Printing?
We’ve referred to skeletons but let’s move away from that and talk about what infill actually means in terms of 3D printing.
As you’re probably aware, FDM printing is done in layers and builds gradually from the base upwards.
The outer part or wall of your model is the bit that you’ll see but this needs to have something to bond with to keep it intact.
The wall is therefore printed as the thickest, solid part of each layer with the infill being made up of a framework of lines within the walls. This needs to be set as a percentage in order for the printer to know how much infill to print.
In order to set this percentage, you’ll need to set the parameters of your print in a slicing program such as Cura.
This will allow you to set and adjust multiple factors of your 3D model before you “slice” it and make it 3D printable.
Setting the infill percentage is fairly straightforward in Cura and is literally a case of entering the percentage you want into the appropriate box.
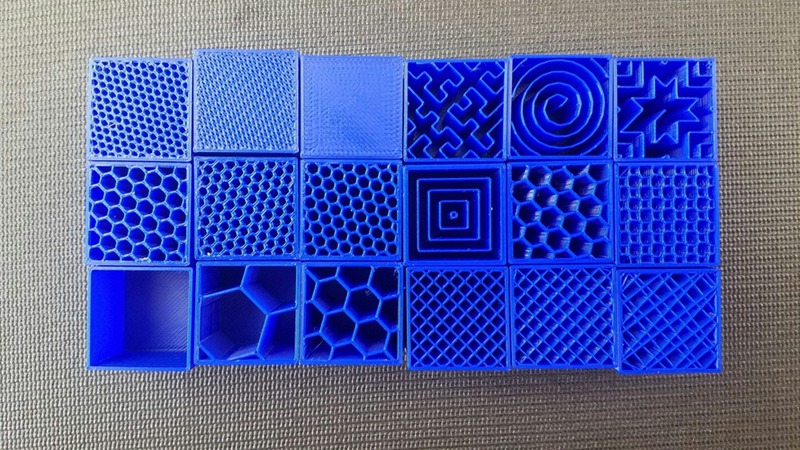
At this point you can also decide on the pattern for your infill. This might not seem that important but it can mean the difference in success or failure of your print.
For instance, choosing a “zig-zag” infill may ultimately provide less internal support than a “grid” or “honeycomb” pattern. This will depend on the model itself and whether there are thicker top layers to your print which might need that extra support.
But again we ask, what percentage do you decide upon?

3D Printing Infill Percentage
As we’ve discussed, the infill percentage that you set for your model will determine its structural integrity and stability.
However, there are other factors to consider in terms of material usage and print time.
A high percentage of infill will naturally use more filament and will definitely increase the time it takes to complete your print.
The main thing we’re looking at here though is what sort of printed items need what percentage of infill.
Let’s have a look at this in the table below:
Percentage Infill | Type of 3D printed item | Description |
0-20% | Non-functioning parts | Items such as display models or figurines. Minimal infill is needed unless some aspects need more supports as mentioned previously |
20-40% | Light use | These would be functional parts such as gear wheels in working models or children’s toys etc. |
40-100% | Heavy duty | Items that need to withstand greater force such as small tools or parts for electrical machinery |
It’s worth noting that adding an in fill above 60% percent won’t necessarily continue to increase the strength of your printed item as its tensile strength will still be a factor.
Another thing to note is the use of different filament types which also have different strengths and weaknesses. This leads us onto the next consideration which is:

Infill Percentage vs Strength
Increasing the percentage of your infill isn’t necessarily a guarantee of increased strength. You’ll need to consider the shape or geometry of your model as well as its orientation when printing.
A model of a human figure for example may have extended limbs which are supported during printing but won’t be when those supports are removed.
The strength of those limbs on your model may then need extra reinforcement from a higher infill percentage if they’re going to stay in situ.
Looking back then at our refence table above, our example of a model figure would require an infill of between 0 and 20%.
An infill of 0% just won’t work so it would need to be a minimum of 10% but, given the extended limbs scenario, you’d be better off with 20%. This will give overall structural support and ensure that the weaker parts of the model stay intact.
As we’ve mentioned, different filament types will also play a part in deciding the appropriate infill percentage for your model.
For example PLA is the most commonly used type of filament in 3D printing due to its versatility and lower working temperatures. However, its not the strongest of materials so even using it for models with a higher percentage infill may still show its weaknesses.
Probably the second most commonly used filament is ABS which has a higher working temperature but displays greater strength than PLA. When using ABS you may find that, using our model figure again, you can maintain a 10% infill and still get the strength you need in the limbs.
We’ve also mentioned the fact that increasing infill over 60% may not in fact be worth it in terms of hoping for extra strength.
We’ll use a different example for this and look at an everyday item such as a plastic rule which you might have sitting on your desk.
If you’ve purchased this from your local stationary store it will undoubtedly have 100% infill as it won’t have been 3D printed but more likely injection moulded. It may still have some flexibility to it but I’m sure if you bend it enough it will reach a breaking point at some stage.
This would be the same if you’d 3D printed the rule with 60%+ infill, the breaking point may be further round the bend but it will still break at some point. By the way, please don’t deliberately break your plastic rule, just take our word for it!

Final thoughts
So, we’ve looked at the different infill percentages that might work best for certain types of 3D prints and hopefully this has given you some idea as to the best strategy for you.
Some of this may however come down to a trial and error scenario so don’t be disheartened if your print doesn’t work perfectly with what you’d expect to be the correct infill.
As we’ve said, there are different variables that may affect the strength of your model and in turn, slight adjustments to the infill percentage may be needed.
In short then, try to use these as a guide and remember to bend but don’t break the rules!
")